Sunday, August 30, 2009

Simply Scrapping again and again and again…

I think everyone has stopped to look at the Simply Scrapping Kits in the catalogue and wondered if they were worth it…especially if you haven’t seen one opened before. Well wonder no more! These kits have TONS of supplies in them and work well for scrapbook pages, cards, and 3-D items. Just look at the picture below. The entire board was made with ONE Simply Scrapping Kit!

PICT5044
 I am way behind on my scrapbooks... a statement that I think we all know very well!! But I'm going to order a couple of these kits and get caught up real quick! I'll be sure to show them off when they are done!

If you are interested in ordering any of the Simply Scrapping Kits just give me a call or send a quick email!!

Friday, August 28, 2009

Chipboard Mini Albums


One of the very cool demonstrations was this great little chipboard album. I whipped up a couple on Monday, and I think this year they might be included in some of my Christmas gifts. They are really easy to make, and don't use a lot of supplies. Remember those hockey card holders that were a little bit stronger than the regular ones? Well, make sure you stop by your local trading card store, because you are going to want to make a whole bunch of theses! Someone suggested that you can get them from the dollar store, but I found that they were actually cheaper at sports card stores. I got my chipboard from the scrapbook store in Hyde Park (how scary is that it's like walking distance from my house?) and she carries black chipboard as well as the traditional kraft colour. I used the Big Shot to create texture on the cardstock for both albums, and some coordinating ribbon. I liked the black because I didn't have use DSP, just some embellishments. I think it looks really classy, what do you think?

So just to give everyone an update on the Fair, we are busy preparing for all the classes, so hopefully I should have some samples to post soon. I have seen a few of the projects and I CAN'T WAIT! Alesha, Kristine, Caitlyn and I had a meeting last night at Kristine's house, to discuss some details, and figured out the layout of the booth. We are going to have TONS of samples, videos of some amazing demonstrations and slide shows of even MORE samples. If our booth doesn't spark your creativity, I'm not sure what will! It was a fun night...including the unfortunate end to a few spiders and a minor issue involving the front end of my car, which to those involved, I found it all actually quite funny and was NOT a big deal, oddly enough I think it was the highlight of my week...

Here is the tutorial for the Chipboard Mini Albums (and thank you to Jodie for designing it!):

Supplies: Chipboard, Whisper White cardstock, Sticky Strip, hockey card holders, DSP or cardstock and embellishments for the covers

  1. Cut one piece of Whisper White, 9" x 3 ½". Whisper White cardstock as it is thinner and will hold together the best!
  2. Accurately measure on the 9" side of this piece every ½", mark with pencil. **This must be accurate or the spin will not sit flat.
  3. Then score at each pencil mark and fold accordion style.
  4. With the first and last edges facing down (this is the side of the spine that will show) place Sticky Strip on every other space between each score line from top to bottom starting with the second space. The first and last spaces are where you will attach the covers to. **Leave the red on the Sticky Strip for now!
  5. With the first and last edges facing upward mark the following ½" spaces with an X; 3-4, 7-8, 11-12, 15-16. This is where the hockey cards will go.
  6. Sticky Strip the "closed" end of the hockey card holders on both sides. **Use full pieces of Sticky Strip for this project, small cut pieces will not hold.
  7. Then peel the red off the Sticky Strip on the front and back of the hockey cards, centre in the sections you marked with an X, and stick both sides in. Continue until all four cards are in place.
  8. Flip over and peel the red off the Sticky Strip from Step 4, and adhere together.
  9. For the covers, cut 2 pieces of chipboard measuring 4 ½" x 3 ½". After trying the smaller cutters, I found the Table Top Cutter works excellent for cutting chipboard of any thickness! If you use thinner chipboard it looks good when you round the corners, but don't try it with the thicker chipboard.
  10. Before adhering the cover to the spine, you will want to decorate the front cover of your albums. As well cut three more pieces of coordinating cardstock or paper for the insides and back cover.
Here is a picture of what the inside should look like:
Enjoy!!

Stamping in Stratford, and a sneak peek at Sweet Treats!

Last night I spent a couple of hours with some great ladies. I got to show off some cute samples, and teach them all about what Stampin' Up is and has to offer. I got to show off one of my favourite sets, "Flight of the Butterfly", I love everything I have made with it!
Here are the two samples I showed off last night. It's so cool to see the different styles you can get with just one set. All you have to change is the colour or the technique and voila, a completely different card!
Kaisa, the hostess, had a great turn out, and should get some really cool hostess awards! I'm so happy her workshop was successful. She is actually a Tupperware Consultant and will be at my house on August 31st for my Tupperware Party! It will be nice to be the hostess and be able to relax and entertain. I haven't really had a lot of people to our house since I've moved in and I'm really excited. I have already started to plan snacks and refreshments...hopefully I don't get out of hand...don't worry ladies, there will be cookies!
Want to know what else I am excited about? The mini catalogue that starts on September 1st!
But more specifically? Sweet Treats!
These little treat cups come in packs of 12 for $3.95. They fit perfectly in a 1 ¾" circle punch (pg 186) and will coordinate with the new "Sweet Centers" stamp set. You can put anything you want in the cups, from little treats, to buttons, to glitter! These two samples would make great treats for kids to take to school for Halloween or Valentine's day, or to slip in your hubby's lunch!!

Thursday, August 27, 2009

September Mini Class: 8 cards, $10


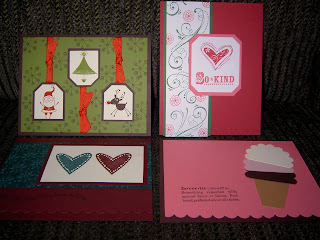
Let's get together for a fun evening and make some cool cards!  The four cards shown here will be the ones we make and you'll make two of each.  The best part is the cost - $10.00 in total.

The date for this will be Wednesday September 2nd at 7pm.  Set some time aside to get creative! These are the four cards we will be making.

Bring-a-friend-Bonus!  If you bring a new friend with you to the event, someone I haven't met before, then you will get to DOUBLE the amount of cards you make! That's 16 cards for $10.00!!

RSVP by email by August 31st. You can also RSVP by phone. See the bottom of my blog for contact information.

Wednesday, August 26, 2009

Movers and Shapers and Samples from Saturday


So the next sample from Saturday's event is the Movers and Shapers dies. It was so nice to see some demonstrate these because I had never seen it done before and really had no idea how they worked. After seeing this demo, Movers and Shapers are now on my wishlist! I can't believe it actually cuts and scores a full card, how cool is that? There is also a new set in the holiday mini coming out on September 1st and I think I'll be picking them up too! The new one comes in a set of four including the ornament with fits with a new sets coming out, Delightful Decorations and Pumpkin Patch! Which I can't want to get too!! Nancy actually won the Delightful Decorations set in one of the draws!!! So here are some sweet samples from that demo:

This card uses the circle from the Movers and Shapers set in the new mini, and the Pumpkin Patch set. It is such a cute and simple set which used the two-step stamp technique. The nice thing about it though, is every pumpkin is different so you don't have to line the faces up perfectly. I've never sent out Autumn or Halloween cards, but I think this year some family might be opening up some of these!

This next sample uses the Delightful Decorations and the ornament die from the Movers and Shapers. I love Christmas and antique ornaments are by far my favourite. My mother has some that were my Grandma's and boy do I want them on my tree!!! So when I saw this new set I knew I HAD to have it! Hopefully in the next couple weeks I should be the proud owner of this set.

That all for today, sorry it's so short. I am off to finish preparing for a workshop! What's a workshop you ask? Well, it's when I come to your home and show you how to make some fabulous projects! The best part: You chose the project, you chose the free hostess awards, you chose the date time. Why? Because it's all about you!! Contact me here if you want more information or want to book a date. I look forward to hearing from you!

Monday, August 24, 2009

Razzle Dazzle Extravaganza


Saturday was officially Razzle Dazzle, and boy was I "razzled and dazzled"!! It ran from 9-4pm at a nice church in the west end. Cait, Nancy, Alesha, Loretta, Jazz and I went together; of course after meeting for some well needed caffeine and breakfast. There were about 70 demonstrators there, including some VERY important and special people! Caroline LeBel from Toronto joined us, and Rhonda Wade!! She was our guest speaker, and is the TOP demo in the United States! What a down to earth lady; her presentations left me very motivated to do my best.

In the morning we had an opportunity to do some convention style swapping, not too many people had swaps but the ladies who did had some great cards! My swap was a colour variation of a card we did in a card club not too long ago. I just love the Cameo Coral; it's such a neglected colour!

There were tons of displays and crazy cool samples. I also participated in the 3D-WOW swap and got some totally cool 3D items! I'm pretty sure I took a picture of almost everything there... I have so much to show off.

The coolest part of the day was the WOW demonstration theatres. There were about 10 different demonstrations and each one was amazing! I have to say though; one was my absolute favourite, so I'm going to show it off today! Don't worry though I will share the rest of them over the next little while, so keep checking back for new postings! I am so excited to try out some of the techniques; I went out right after the event to get some supplies for a couple of them.

So remember how I mentioned my upline Alesha was amazing? Well, she did, by far the coolest demonstration ever...

QUILTING WITH THE BIG SHOT!

I have trouble controlling my excitement about this new discovery! Her mom is a quilter and they've been making quilts and decorative pillows with die cuts from the Big Shot. Each piece she showed was for a quilt that she was working on for her daughter's dolls, how adorable! All it takes is some coordinating fabric, steam-a-seam (basically double sided tape for fabric), an iron, and the dies you want to use. The adhesive will work on pretty much any fabric so if you have no idea how to quilt like me, don't worry! It works on tea towels, blankets and other pre-made items. I don't want to spoil all her fun so be sure to check her posting about one of the pillows she made. To top that off, she made all six of us who went together (Alesha, Cait, Nancy, Jazz, Loretta and myself) each a super cute mini pillow AND she made the most adorable photo board with the new Build-A-Bear dies that are coming out in the new mini catalogue. I LOVE THEM! So thank you for such a great demo and thank you for being the greatest upline EVER! I am truly "wowed" by everything you design!

At the end of the day, Alicia Ryckman gave a way one of everything out of the new mini catalogue coming out September 1st. Everyone at my table won something... except me... but that's ok, I just get to borrow everything!

Come back tomorrow, I'm going to show off some sweet samples and the cool cards you can make with the Movers and Shapers dies!


Sunday, August 23, 2009

Razzle Dazzle – Shoebox swap on Friday night

Every quarter Alicia Ryckman (an absolutely fabulous demonstrator and my up-up-up....line) holds a huge meeting for all of her demonstrators. This time it was an event called the Razzle Dazzle Extravaganza. The event was actually on Saturday, but Friday night a group of us demonstrators got together for a shoebox swap! It was so much fun to see what everyone designed for us to make. Every card was super cute and super simple! Mine was this cute card:

Stamp: Define Your Life
Cardstock: Chocolate Chip, Regal Rose, Very Vanilla, Pink Pirouette
Ink: Chocolate Chip
Accessories: Scallop Edge, Scallop Circle, Tag Punch

Here are some photos of the other cards we made:


I love each one so it is hard to pick a favourite! I do really enjoy the two Christmas ones on the left of the top photo and the tractor was just adorable! The bottom left in photo one was designed by Nancy, top right in photo two was designed by Alesha, and the rose red flowers in photo two were designed by Cait. Great work ladies!

Each card was very easy to make, and I would love to demonstrate, so if there are any you like, contact me to arrange a class in your home!

Friday, August 21, 2009

Elegant Snowflake Ornament

I found this tutorial a while back and finally tried it out. It just looks so pretty when it's done, and was super easy to make. I've made a few with different designer paper, and each one looks different when it's done. So fitting for a snowflake considering in nature each one is different too! It doesn't use a lot of paper so it's great for scraps, just be sure to use the thinner DSP, the thick stuff doesn't stick together as well... So anyone who has some designer paper laying around this is the project for you! Here's the link. Enjoy!

Thursday, August 20, 2009

A quick summary of the Western Fair Classes

This is the complete list of classes that our Stampin' Up! booth will be teaching at the Western Fair this fall. We are very excited to have partnered with the Western Fair to offer these classes for FREE to crafting enthusiasts in London & Area. If you are visiting the Western Fair this September pop by our booth in the Canada Building.

  • We will have room for 12 crafty people at each class. You have to get a ticket for the class in order to attend it. Tickets are free, we will not charge for a class. If you would like to attend a class, you must be at least 18yrs old.
  • We will be distributing free tickets to the class in the same manner that the Creative Festival in Toronto does.
  • Tickets are available at the information booth located inside the Canada Building (same building we are located in). There will be a sign posted for the class about 40 minutes before the class starts - line up at the sign. At 15 minutes prior to the class the agent at the information booth with give 12 tickets to the first 12 people in line. These will be specially printed tickets. Once you have a ticket, bring it to our booth and you can have a seat in the Stampin' Studio located right next to our booth. Classes are on a first come first served basis - If you want to come to the class it will be worth the wait in line.
  • If you don't know what the Canada booth looks like, here's a photo of it on the Western Fair's website: http://www.westernfair.com/rentals/rentals-canada.html
  • We will also have little cards made up for people who don't get a ticket asking them to visit out booth for information on how to attend a similar class after the fair. We would love to be able to teach you all at once, but there just isn't enough space to accommodate classes larger than 12.
  • All of the classes will be free. You don't have to bring anything with you - we will have all of the supplies right there for you.

Friday September 11th

1:00pm: Make a set of fabulous notecards

3:00pm: How to rubber stamp & make cards

5:00pm: Technique class on decorative scoring

7:00pm: Easy "Big Shot" birthday cards

Saturday September 12th:

12:30pm: Elegant hand-made wedding invitations

1:30pm: Punch art animals

3pm: Christmas 12x12 scrapbooking layout

5pm: Technique class on watercolouring

Sunday September 13th:

11:30pm: Simple Halloween treat favour class

2:00pm: Great projects featuring dry embossing class

5pm: Simple stamped holiday gift tags

7pm: Rubber stamping techniques

Monday September 14th:

5pm: Old time handmade Christmas card class

7pm: Elegant hand crafted thank you card class

8:30pm: Winter 12x12 scrapbooking layout class

Tuesday September 15th:

5pm: Tear it up with Stampin' Up!

7pm: Handfolded decorative snowflake ornament class

8pm: How to use a die cut machine

Wednesday September 16th:

5pm: Decorative punch art class

7pm: Make a notebook with designer paper

Thursday September 17th:

12:00pm: Beginner Birthday card class

2:00pm: "Thinking of you" handmade card class

4:00pm: Post-it Note purses

7:00pm: Technique Class: Rock 'n' Roll

Friday September 18th:

12:00pm: Krafty Christmas Card class

4:00pm: Rubber stamping 101 class

5:30pm: Origami Box wedding favours

7:30pm: Handmade notebook with die cuts

Saturday September 19th:

1:00pm: Funky & Fast Thank you cards

3:00pm: Halloween 12x12 scrapbook layout class

4:30pm: Easy handmade wedding favour class

7:00pm: How to make easy birthday invitations & cards

Sunday September 20th:

12:00pm: How to make a greeting card from scratch

2:00pm: Fun and Easy invitations

5:00pm: Punch art class

7:00pm: Basics of card making class

8:00pm: Basics of scrapbooking class


We are very excited to offer you these classes. If you would like more information about these classes, check back over the next month as I will be posting detailed information about each individual class - including who is teaching it, photos or the designs and projects, the supply list of the materials used to create the projects and more.

Sunday, August 16, 2009

Congrats AJ! You are one smart cookie!

A friend of mine just graduated from Police Foundations and his wife threw a surprise party for him. I thought it would be nice to make a card for him that would be different and special. Unfortunately when Darren and I got the invite I didn't read it all (we were still camping and I only glanced at it).


So I sat down this morning and made a great birthday card for him. I'm not sure why I thought it was his birthday, it's in November! But it wasn't until I was done did my best friend, Cait, mention something about him graduating... So after accepting my brief lack of brains, I sat down again to make a Graduation card.

I didn't want to waste the birthday card, so I gave him both... The nice thing about them is that they show two completely different techniques and styles. The first one uses pastels and glitter. I used the set "Crazy for Cupcakes" and some retired DSP. I coloured the cupcake with pastels and added the glitter as sprinkles. It's not easy making a boy card!!

The second card was more fun! I was trying to design a graduation card with no stamps related to graduation. I kept thinking about cookies and being a "smart cookie"... I think because I was still recovering from my dumb moment, or maybe because I baked cookies last night around 1am... Somehow that led to Cookie Monster! It was acutally very simple and turned out really well. So cute!

The base of the card is Brilliant Blue, cut with the Big Shot Scallop Circle Die. Then I cut a white circle (3 ¾") for the inside and a black circle (3 ¼") for his mouth with the Circle Scissors Plus. His eyes are 1 ⅜" circle punches and ¾" circle punches. To make the cookie, I punched out several ½" circles in Chocolate Chip and attached them randomly to a strip of Kraft. Then I punch out a 1⅜" circle from the strip. Last I used the scallop circle punch to create the "bite" out of the cookie. I'm really happy how well it turned out, and how EASY it was! I think I'll try some of the other Sesame Street characters tomorrow!

Tuesday, August 11, 2009

Butterflies, Soft Suede and Rock and Roll...What a wonderful combo!

So a few of us have been meeting together to finalize the class list and schedule for the Western Fair. So far we have about 40 different classes planned! Have I mentioned they will all be FREE??!!?? If you miss a class or you don't get a ticket to participate, you can sign up at the booth for myself or any of the other demos to teach the class in your home...for FREE!!

I will post the schedule as soon as it is complete. It's so much planning and prep, but so far it is going to be sooooo worth it! I am going to be there at least 5 days, and I'm teaching a whole bunch of classes! I CAN'T WAIT!

Meanwhile I wanted to show off a cute card that my upline did with us at our last meeting. We used the rock and roll technique for the butterfly. I loved it so much I'm using it at some upcoming workshops. Let me know what you think.

Recipe:
Cardstock: Ruby Red, So Saffron, Soft Suede, Whisper White
Ink: Ruby Red, So Saffron, Soft Suede
Accessories: Scallop Edge Punch, Soft Suede Polka Dot Ribbon

Wednesday, August 5, 2009

Western Fair... We'll be there... Will you??

I am so excited to announce that we will be having a Stampin Up booth at the Western Fair! The best part is that my upline Alesha, has invited her team to join her! We will be there daily from Sept 11th - 20th, so come down and meet us! We will have some fantastic projects and demos to show you.

On top of that...it gets even better... We will be offering FREE, yes I said free, classes everyday! The plan right now is to have at least two classes in the afternoon and two in the evening. That means 40 different classes in 10 days! So the question is: What would you like to learn? Leave a comment on this posting about what you want to learn.

There will be something for everyone: stampers, scrapbookers, cardmakers, brides-to-be, moms-to-be, quilters, the list goes on!


Click the fair icon to get advanced admission tickets.


Just Buzzin' Buy!

I just love this card! The layout idea came from my upline, Alesha. When we made it with her we used black and summer sun with DSP that was red. I thought I would change it up and incorporate the Pink Flamingo DSP, the little pink flowers are so cute!

Recipe:
Cardstock: Summer Sun, Chocolate Chip, Whisper White
Designer Paper: Pink Flamingo
Stamps: Just Buzzin' By
Ink: Chocolate Chip, Summer Sun Stampin' Write Marker
Accessories: Scallop Edge, Scallop Circle, 1 3/8" Circle Punches

Blogger template 'Orange' by Ourblogtemplates.com 2008